Dive into the latest industry wisdom from

our experts

Leveraging LLMs in the Corporate Sphere

The corporate landscape is experiencing a transformative shift with the integration of Large Language Models (LLMs) such as OpenAI's GPT-4. These AI-driven tools offer specific, tangible benefits in cost reduction, employee onboarding, and enhancing workplace experiences. In this article, we delve into real-world examples that demonstrate how LLMs are transforming the corporate environment.
Cost Reduction Through LLMs
Automating Customer Service
LLMs are being employed to handle customer inquiries more efficiently. For instance, the use of chatbots powered by GPT-4 can provide quick, accurate responses to customers' questions, resulting in decreased waiting times and a reduced need for human customer service agents.
Enhancing Content Creation
LLMs can generate high-quality content at a fraction of the cost of traditional copywriting services. Businesses can utilize AI-generated content for marketing campaigns, social media updates, and website copy, significantly reducing content creation costs.
Supply Chain Optimization
LLMs can analyze vast amounts of data to identify patterns, trends, and anomalies, enabling companies to optimize their supply chains. Early adopters who have successfully implemented AI-enabled supply-chain management have experienced improvements in logistics costs by 15 percent, inventory levels by 35 percent, and service levels by 65 percent compared with slower-moving competitors.1 For example, Walmart uses AI to manage its vast inventory, resulting in reduced waste, lower storage costs, and improved customer satisfaction.2
Route Optimization for Transportation
Companies like UPS are leveraging AI to reduce costs by planning the most efficient routes for their fleets. UPS uses its proprietary AI-driven system, ORION (On-Road Integrated Optimization and Navigation), to analyze numerous data points and determine the optimal route for drivers. This has resulted in significant reductions in fuel consumption, vehicle maintenance expenses, and overall delivery times.3
Since ORION’s initial deployment, it has saved UPS about 100 million miles and 10 million gallons of fuel per year.4

Revolutionizing Employee Onboarding
Customized Training Solutions
LLMs can help create personalized onboarding experiences that cater to each employee's unique needs. For instance, Amazon uses AI to tailor individual training programs for warehouse employees, ensuring they are equipped with the skills and knowledge required for their specific role and continuously tracking how each employee performs. 5
Intelligent Assistance
New employees can benefit from AI-driven virtual assistants that offer support and guidance throughout the onboarding process. IBM's Watson Assistant, for example, provides personalized answers to employees' questions and helps them navigate company systems and procedures.6

Elevating the Employee Experience
Collaborative Tools
LLMs can help improve cross-team collaboration by breaking down language barriers and summarizing complex information. For example, tools like Google Translate & DeepL use AI to provide real-time language translation, enabling teams from diverse backgrounds to communicate and collaborate seamlessly.
Workflow Optimization
LLMs can analyze employees' daily tasks to identify bottlenecks and inefficiencies. This data-driven approach allows for better allocation of resources and more streamlined workflows. For example, JPMorgan Chase & Co. implemented its AI system, COIN, to analyze and extract relevant data from legal documents, saving countless hours of manual work.7
Mental Health and Well-being Support
LLMs can be used to create AI-driven well-being solutions, such as mood trackers and stress management tools. For example, Headspace, a popular meditation app, employs AI to provide personalized recommendations and content, fostering better mental health and work-life balance.8
Conclusion
LLMs are more than just a technological advancement; they represent a paradigm shift in the way businesses operate. By providing specific, real-world applications, LLMs can effectively reduce costs, streamline employee onboarding, and elevate the workplace experience. As AI technology continues to evolve, businesses that leverage the full potential of LLMs will stay ahead of the curve, maximizing efficiency, productivity, and employee satisfaction.
- https://www.mckinsey.com/industries/metals-and-mining/our-insights/succeeding-in-the-ai-supply-chain-revolution?ssp=1&darkschemeovr=0&setlang=en-XL&safesearch=moderate
- https://hbr.org/2022/11/how-walmart-automated-supplier-negotiations?ssp=1&darkschemeovr=0&setlang=en-XL&safesearch=moderate
- https://www.forbes.com/sites/blakemorgan/2018/09/17/5-examples-of-how-ai-can-be-used-across-the-supply-chain/?ssp=1&darkschemeovr=0&setlang=en-XL&safesearch=moderate&sh=1a7ceac0342e
- https://about.ups.com/us/en/newsroom/press-releases/innovation-driven/ups-to-enhance-orion-with-continuous-delivery-route-optimization.html?ssp=1&darkschemeovr=0&setlang=en-XL&safesearch=moderatehttps://about.ups.com/us/en/newsroom/press-releases/innovation-driven/ups-to-enhance-orion-with-continuous-delivery-route-optimization.html
- https://www.theverge.com/2019/4/25/18516004/amazon-warehouse-fulfillment-centers-productivity-firing-terminations
- https://www.ibm.com/watson/empower-workforce-ai-full/
- https://d3.harvard.edu/platform-rctom/submission/jp-morgan-coin-a-banks-side-project-spells-disruption-for-the-legal-industry/?ssp=1&darkschemeovr=0&setlang=en-XL&safesearch=moderate
- https://www.businesswire.com/news/home/20220112005244/en/Headspace-Health-Announces-Acquisition-of-AI-Driven-Mental-Health-and-Wellness-Company-Sayana?ssp=1&darkschemeovr=0&setlang=en-XL&safesearch=moderate

Introducing Forestry: A Logging Framework by Cleevio

Let us introduce Forestry - a GitHub repository - the very first open-source logging framework for Swift projects developed by Cleevio. By leveraging the power of open-source solutions, Forestry integrates most of the market-leading cloud logging services, providing developers with a versatile logging tool for their iOS projects.
Supporting open-source
At Cleevio, we believe that open-source solutions can be beneficial for everyone. By making software code publicly available, everyone can harness the power of collaboration and innovation to create better, more reliable solutions.
With open-source software, you are not limited to a single development team or organization. Instead, you can benefit from the collective intelligence of a diverse, global community of developers, all working together to create something great. Who would not support that?!
By creating our own open-source project, we hope to show that we're committed to quality, innovation, and engagement. Ultimately by embracing open-source solutions, we're not just creating better software. We are building stronger communities and driving progress in the tech industry. Giving back to the community is important to us, as we ourselves rely on several open-sourced libraries.
Meet Forestry
Our team envisioned a versatile logging framework for iOS projects that could easily cater to specific logging needs. We aimed to facilitate seamless switching between logging services without disrupting the existing codebase.

Forestry integrates most of the market-leading cloud logging services. To name a few, we support Datadog, Sentry, and Logrocket. Written entirely in Swift, it uses SPM for dependency management and is licensed under the MIT license.
We focused on making the library easily extensible so that anyone can add integration with their preferred logging service fast and be production-ready in just a few hours.
A typical workflow with Forestry involves using console logging for development, a cloud logging solution like Datadog for QA testing, and finally, using Sentry for error logging in production. This enables our team to quickly debug all issues without spending time integrating these tools.
The mentioned workflow will be implemented as follows:
You can always expand the functionality by creating your own logging service by conforming to the LoggerService protocol. ForestryLoggerLibrary documentation
Also! Everyone can rest easy, we have covered the whole ForestryLoggerLibrary with tests, so we are sure every event is delivered.
Conclusion
If you're looking for a powerful and user-friendly logging tool for not only iOS projects, Forestry is a fantastic choice. With its straightforward setup and smooth transition between logging services, Forestry is an easy-to-use solution that can significantly enhance your logging capabilities. What's more, its extensible architecture allows developers to add new logging services quickly, saving them time and effort.
We're always looking to improve, so If you manage to try it - please take a moment to share your feedback with us.

State of the AI Community: Exploring Ethics, Impact, and Applications

As a company that strongly believes in the importance of community building, we were thrilled to have the opportunity to showcase and discuss some of the most exciting developments in this field. The AI community is a vibrant and dynamic group of researchers, developers, and enthusiasts dedicated to pushing the boundaries of what is possible with AI.
In-person discussions within the AI community have been focused on three main themes that have generated significant interest and engagement online in recent months. These themes include the ethics of AI, the impact of AI on the labor market, and the practical applications of this powerful tool in real-world settings.
The potential of AI in a Wide Range of Applications
What makes AI so special is its ability to understand the nuances of language and generate contextually appropriate responses. This technology is increasingly being used in a wide range of applications, such as chatbots and virtual assistants, making our interactions with technology more seamless and natural.
“OpenAI and AI, in general, have the potential to be powerful tools and great assistants in tackling some of the most pressing challenges facing our world today, varying from healthcare to automotive. These technologies are transforming industries, unlocking new opportunities for growth and development and positively impacting human lives.” - David Zadražil, CTO at Cleevio

Addressing Ethical Concerns in AI Development and Use
It is important to recognize that AI is not without its challenges, and the community noticed that. One of the most significant challenges is ensuring that AI is developed and used ethically. There is a growing awareness of the potential risks caused by AI, such as perpetuating bias, data vulnerability, or AI being used for malicious purposes.
According to AI statistics, 52% of consumers do not believe AI will protect their private information. (Blumberg Capital)
The community discussed the need for transparency, which is currently offered scarcely in learning data and training models. This could help to minimize harmful speech, usually referred to as one of the issues. Resulting in the need for ethical guidelines and frameworks to ensure that AI is used responsibly and beneficially.
And they are not the only ones mentioning some form of proper research and regulation. An open letter has been signed by several prominent AI researchers — and Elon Musk — urging AI labs worldwide to halt the advancement of large-scale AI systems. The signatories argue that such software carries significant dangers to humanity and society. Appealing that caution is necessary. Signatories include Apple co-founder Steve Wozniak, Skype co-founder Jaan Tallinn, and a number of well-known AI researchers and CEOs.
AIs Impact on the Labor Market
One of the mentioned key effects of AI on society is the change in the labor market - especially in job roles that involve repetitive and routine tasks. With the development of AI technologies such as ChatGPT, which can automate customer service interactions and generate content, some jobs may become redundant, while new roles that require skills such as data analysis and machine learning will be created. Administrative workers are expected to be most affected, compared to the “little effect” seen on physically demanding or outdoor occupations, such as construction and repair work.
50% of the consumers believe people are already losing jobs and are being replaced by computers. (Blumberg Capital)

The rise of AI is also changing the way people work, with many companies adopting remote working models and leveraging AI tools to improve collaboration and productivity. As the field of AI continues to evolve, individuals and organizations need to adapt and upskill to remain relevant in the changing job market, from which 85 million jobs will be eliminated and 97 million new ones created thanks to AI by 2025. That’s an overall addition of 12 million jobs. (World Economic Forum)
Conclusion
That being said, we believe the AI community is and will remain a driving force behind some of the most exciting developments today. To stay relevant and competitive, we would suggest curiosity above everything else. With AI becoming more integrated into our daily lives, we must continue to develop and use this technology smartly and responsibly. As we continue to explore the possibilities of AI, we have the potential to transform our businesses in ways we never thought possible.
If you want to attend the next community event focused on AI, follow us on social media and stay tuned for more.
Data and statistics found in the article can be found in Blumberg Capitals 2022 AI Survey.

The Not So Equivalent Code: Demystifying Async Publisher
Working in agency development provides the benefit of frequently starting new projects, allowing us to start fresh - with a clean slate.
It means we can take advantage of new APIs provided by Apple without worrying about supporting older iOS versions with legacy code. We can also build upon what worked well in previous projects while eliminating any previous shortcomings.
For instance, in our most recent projects, we incorporated Swift's modern concurrency, which significantly streamlined the code in our application. It resulted in easy-to-follow code and reduced the likelihood of errors compared to similar projects that used Combine.
Using Modern Concurrency and one thoughtful comment in a code review from my colleague helped me realize a lot about the obvious - a behavior of AsyncSequence1, as well as the safety issues AsyncPublisher poses.
It all started with a test
Code written with async await. The next step was to write a test for its functionality. Since the test involved observing a @Published property in a SignInViewModel, my initial instinct was to utilize Combine. One of the resulting tests took the following form. Implementation details of SignInViewModel are beyond the scope of this article. Its primary function involves validating the inputs (email and password) when certain conditions are met. In this instance, the error is shown under the text field when it stops being the first responder.
The test passed, and I was happy and submitted it as a part of a merge request with other sign-in functionality and tests.
During the code review, a colleague suggested using async-await in the test instead of Combine. We briefly discussed it, and both believed the result would be equivalent. The idea led me down a rabbit hole that took me some time to navigate. The rewritten tests using Swift’s for await loop were failing randomly. It made me question the validity of my code and the implementation details of the SignInViewModel. When I looked into the details, the failure was caused by a timeout – there was a different amount of received values than expected. As I debugged the code, I discovered that observing viewError in the for-await loop resulted in various counts of the received values. I discovered that the behavior of AsyncSequence was different from what I had expected, despite reading various books, articles, and documentation.
Let’s put rubber boots on and start digging.
The first dig: Comparing AsyncPublisher vs subscribing via Combine
I will leave SignInViewModel for the rest of this article. Let us start with something simple and continuously increase the complexity to learn what is happening here; why the tests were failing and why they did so randomly. Let us leave the documentation behind, observe their behavior and devise the reasoning once we get there.
Let us first start with preparing a publisher. PasshthroughSubject should be a good candidate for this:
And let us observe it with basic sink in Combine and via for await loop, and print the received value.
There is no observable content, so let us send something through the pipe:
Now, if you look into the console, you will see lots of printed results– and if you look deep into the prints, most probably will be the same amount of prints from both sources – AsyncPublisher being the same as a basic sink.
So, why was it failing the test and not here? I got the notion of what is happening based on the initializer on AsyncStream. The initializer looks like this:
What caught my attention is the bufferingPolicy parameter, which decides how to buffer unused sequence items – whether they should stay there (and be buffered) or go. Let us test this assumption that the difference of for-await loop and sink would be noticeable when we introduce some delay with some heavy workload – such as finding the nth prime number in form of calling primeCount(100)2.
After introducing the delay, we finally have a minimum observable example of the issue. As you can see, the number of prints no longer corresponds - some numbers in the for-await loop are skipped, resulting in varying results across runs. It's worth noting that the highest number in the async for loop often ends in numbers other than 99, such as 97, which is the last number processed correctly.
Why does the for-await loop behave like this? It likely uses a buffering policy that discards some elements that aren't immediately consumed. While the exact buffering policy setting isn't crucial to this investigation, as you will see in a section about AsyncStream, it buffers a lot.
However, what's most important is how the for-await loop works. It only continues the iteration after the closure of the current iteration is over, ensuring that the for loop iterates synchronously while getting the items in a sequence asynchronously.
Counting differences
While it is interesting to see the number of prints varies, it still requires us to look at the code and try to guesswork. Let us prepare a counter to have a more reliable representation of results. I made the counter using an actor that takes a type as a parameter so that we can have a clear console:
The implementation is as follows:
As you can see, after every call to addToCount() is made, the counter increases by one and the count of the type is printed out, which means that the last print of a given type will be the relevant one for us.
Let us test it and see the results, first by instantiating the counters and using them inside our existing code (in Combine fashion, we have to create a Task to call asynchronous function):
Now we can finally see in numbers how much has been lost. The Combine counter’s last print is 100. For async, it is 83. Therefore, 17 % have been lost on my M1 Max without optimizations.
Making for await loop of AsyncPublisher work
We now have established a baseline and a test environment. We have observed that Combine works without any issues. Now let's focus on fixing the for-await loop to obtain the desired results.
Fortunately, the fix is straightforward. We need to create a Task and handle the for-await loop asynchronously without waiting. Doing so will cause us to lose the benefits of sequential code execution that Modern Concurrency provides. However, it will fix the issue that we have been dealing with.
This solution works because creating a Task is not a computationally expensive action that would cause us to lose an integer. Under normal circumstances, this approach should work well.
AsyncPublisher is not safe
In the previous section, we got to a point in which everything worked the way we desired – by asynchronously processing the items in the sequence, we were getting the same results from observing the for-await loop as with the Combine. Does this mean we can safely use AsyncPublisher without worrying about losing inputs? Unfortunately, no.
All it takes is to send a value concurrently, and we will be back where we started. For instance, in my working environment, after the following code was executed, the counter in Combine was at 1000, on async with 695. Not great.
Observing with a for-await loop is unfortunately not secure and can lead to data loss. Depending on the situation, there may be some ways to mitigate this issue. For example, if we know how many items we will receive, we can use collect() on the publisher. However, I do not see any good way to make the for-await loop work in the same way as subscribing to the publisher in Combine, where we can always handle it through async code. I have tried several other options, such as creating an AsyncIterator out of AsyncPublisher, but that did not yield any positive results.
These limitations are inherent to the for-await loop, as it only works on one thread and does not make any guarantees. However, we can leverage this limitation to our advantage in certain use cases, particularly when using it with AsyncSequence - or its implementation, AsyncStream.
AsyncStream to the rescue
AsyncStream is a built-in implementation of AsyncSequence in an asynchronous context. It allows awaiting its results in a sequence as well as allows publishing it (yield in async terminology) to sequence at any time with its continuation.
It is very easy to instantiate it, for our purposes, we can do something like this:
As you can see, I am storing the asyncStream in a variable for us to use later in the code, as well as storing the continuation. Although we unsafely unwrap the variables, the code is safe because AsyncStream returns the continuation in its init immediately (the provided closure does not escape the current scope).
Observing the AsyncStream is simple – we just need to make a simple change in our for-await loop. Since AsyncStream is an AsyncSequence, we can iterate it directly, just like any other Collection (such as Array). The only difference is that we do it asynchronously.
Continuing with our example, here's how we would yield the integers to the continuation:
With AsyncStream, the counter gets to 100 every time. The same applies when we count to 1000 with the code we already used. Not an integer gets wasted.
We no longer have to even process the items asynchronously, so we can simplify the observing code to just:
And why is it that AsyncStream works? It is because of its buffering policy - which is defined in its initialization. By default, the policy is unbounded, meaning every integer gets buffered regardless of how long it takes to process a single iteration.
We could very well destroy the ability of our AsyncStream if we wanted. For example, if we initialized AsyncStream with bufferingPolicy: .bufferingNewest(1), the counter would show only 2 instead of 1000. It supports the hypothesis that AsyncPublisher has a buffering policy, possibly a substantial one, but we still need to understand its limits for situations where we need it.
AsyncStream is a hero in our story because it allows us to set the buffering policy to fit our needs and expectations. It enables us to observe asynchronous values in an asynchronous context.
But what if we needed to observe a Combine publisher?
The question is: How do we asynchronously observe a Combine publisher? As I showed you earlier, we can achieve this by simply calling Task {} in the sink of the subscriber. However, this method doesn't allow us to use the ordered processing of the items that a for-await loop does.
If we create our own publisher, my recommendation is to use AsyncStream instead of Combine publishers, as long as we don't need to use reactive magic for other parts of the code.
If we cannot create our own AsyncStream or we want to observe a publisher we did not create, we can always create an AsyncStream, subscribe to the publisher, and yield the values to the AsyncStream.
And – to speak less abstractly – I think this may be a nice way to signify the differences between observing a stream in a for-await loop and awaiting the results and observing in Combine with sink in showing the information messages in the application.
Let’s say we have a following function from which we show the infoBar:
If we observe the publisher in Combine, we get the following result. As you can see, the messages get shown over each other - not the greatest behavior.

But we can always do it from AsyncStream and await the result of the completion via withCheckedContinuation, like this:
And the result is a readable message that is shown one after the other. We get the behavior we want without any difficulties. And what is best, we can use Modern Concurrency, so the code is quite readable.

Final Thoughts
Incomplete documentation is the cause of our limited understanding of Swift's Modern Concurrency, leaving us with much still to learn. As a result, we can only presume and guess. While we could learn more by analyzing the source code, doing so may not be a good use of our time, and it may be difficult to grasp all the details just by looking at it.
Therefore, further investigation in this area is needed. I hope more people will delve deeper instead of only scratching the surface.
In the meantime, let's not rush into rewriting every bit of code in async-await without careful consideration. We should always check our assumptions to avoid introducing unnecessary bugs.
1 In essence, AsyncPublisher enables observing any result from a publisher in an async for–await loop. You can find more in documentation https://developer.apple.com/documentation/combine/asyncpublisher
2 You can find a gist here: https://gist.github.com/lvalenta/07770221e7d653f6cfad6f2bda63af73 – It is just a random function a colleague found

Cleevio's Take on Creating Meaningful Client Relationships
Building a successful business partnership with your clients is essential in today’s competitive business environment. We believe it is necessary to create stable and lasting relationships with our clients that go beyond just sales. Here are some essentials we see as crucial in building business partnerships with our clients that go far beyond sales.
Listen and Understand
Listening to our clients and understanding their needs is fundamental to forming a successful business partnership. As well as asking questions and being open to learning more about their business, challenges and goals. This not only helps in future business, as our insight is already deeper but also creates a lasting bond.
Personality Matters
Take the time to get to know your clients on a personal level. Ask questions not only about their business goals and objectives but hobbies, interests and families as well. And really listen to their answers, as you never know who likes drone racing or goes to the same gym as you. This helps us develop a deeper understanding of our client’s needs and creates strong relationships.

Offer Extra Value
Once we have a better understanding of our client’s needs, it is time to start offering them tailored solutions to help them meet their goals. We believe in providing services that go beyond what our clients are expecting. Showing that we’re willing to go above and beyond helps us stand out from the competition and create a strong bond between us and our clients.
Build Trust
Trust is key to any successful business partnership. We are honest and open with our clients and make sure to deliver on our promises. This helps us build two-sided relationships with our clients, allowing us to communicate openly and freely.
Value Input
We facilitate product feedback through various channels i.e. data analytics or user feedback during live sessions. We sit down with our clients, go through relevant data, then combine it with the client's domain expertise and at the end, plan together what to build next.
By following these practices, we were able to build successful business partnerships with our clients that go far beyond sales and help us grow.
If you are interested in discovering how we approach our business partners, do not hesitate to get in touch.

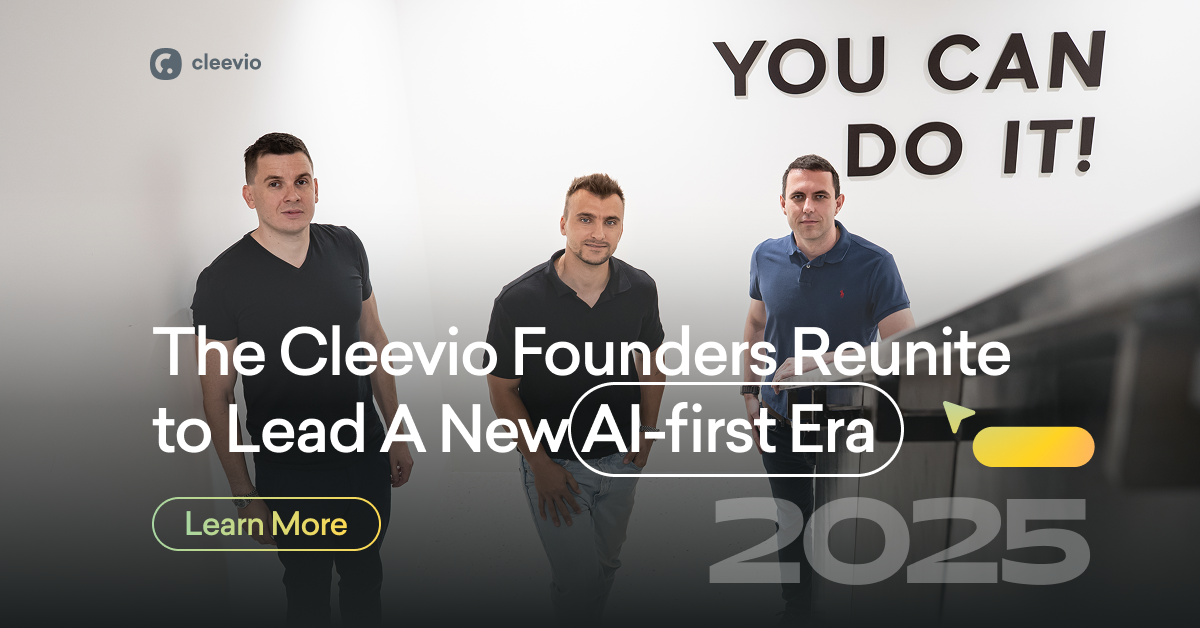
Cleevio Rebranding: Why We Decided To Change

Today, we’re updating our website and brand to better reflect what we stand for at Cleevio. And even more importantly, what we can do for our clients.
Why
Cleevio always has big plans and aspirations. From building excellent digital products to creating a great place to work. As we evolved, the change was needed at last - not only in the brand but also in our services, which are now oriented towards long-term partnerships and focusing on the best value we can bring.
This growth, combined with the opening of our new office, meant that our website and branding no longer represented all the things we are doing and stand for.
Defining Cleevio
As it turns out, everybody at Cleevio had their preferences about how we should present the company. This creates a tangled web of powerful opinions on visuals. But these can be untangled – if you take a step back. To tell our story to the world, we first need to sit down and define it for ourselves. For that, we partnered up with Lukáš Burkoň, the leader of our new division, Cleevio Growth.
We conducted a workshop series on value propositions, customer profiles, and internal goals (just like we use with our clients, but for our own company!). With everybody on the same page, we achieved alignment across the company on the values and goals we should represent. Using the StoryBrand and brand archetypes frameworks, we crafted our tone of voice and brand personality: Creative Sage. Inspirational, guiding, articulate and knowledgeable.
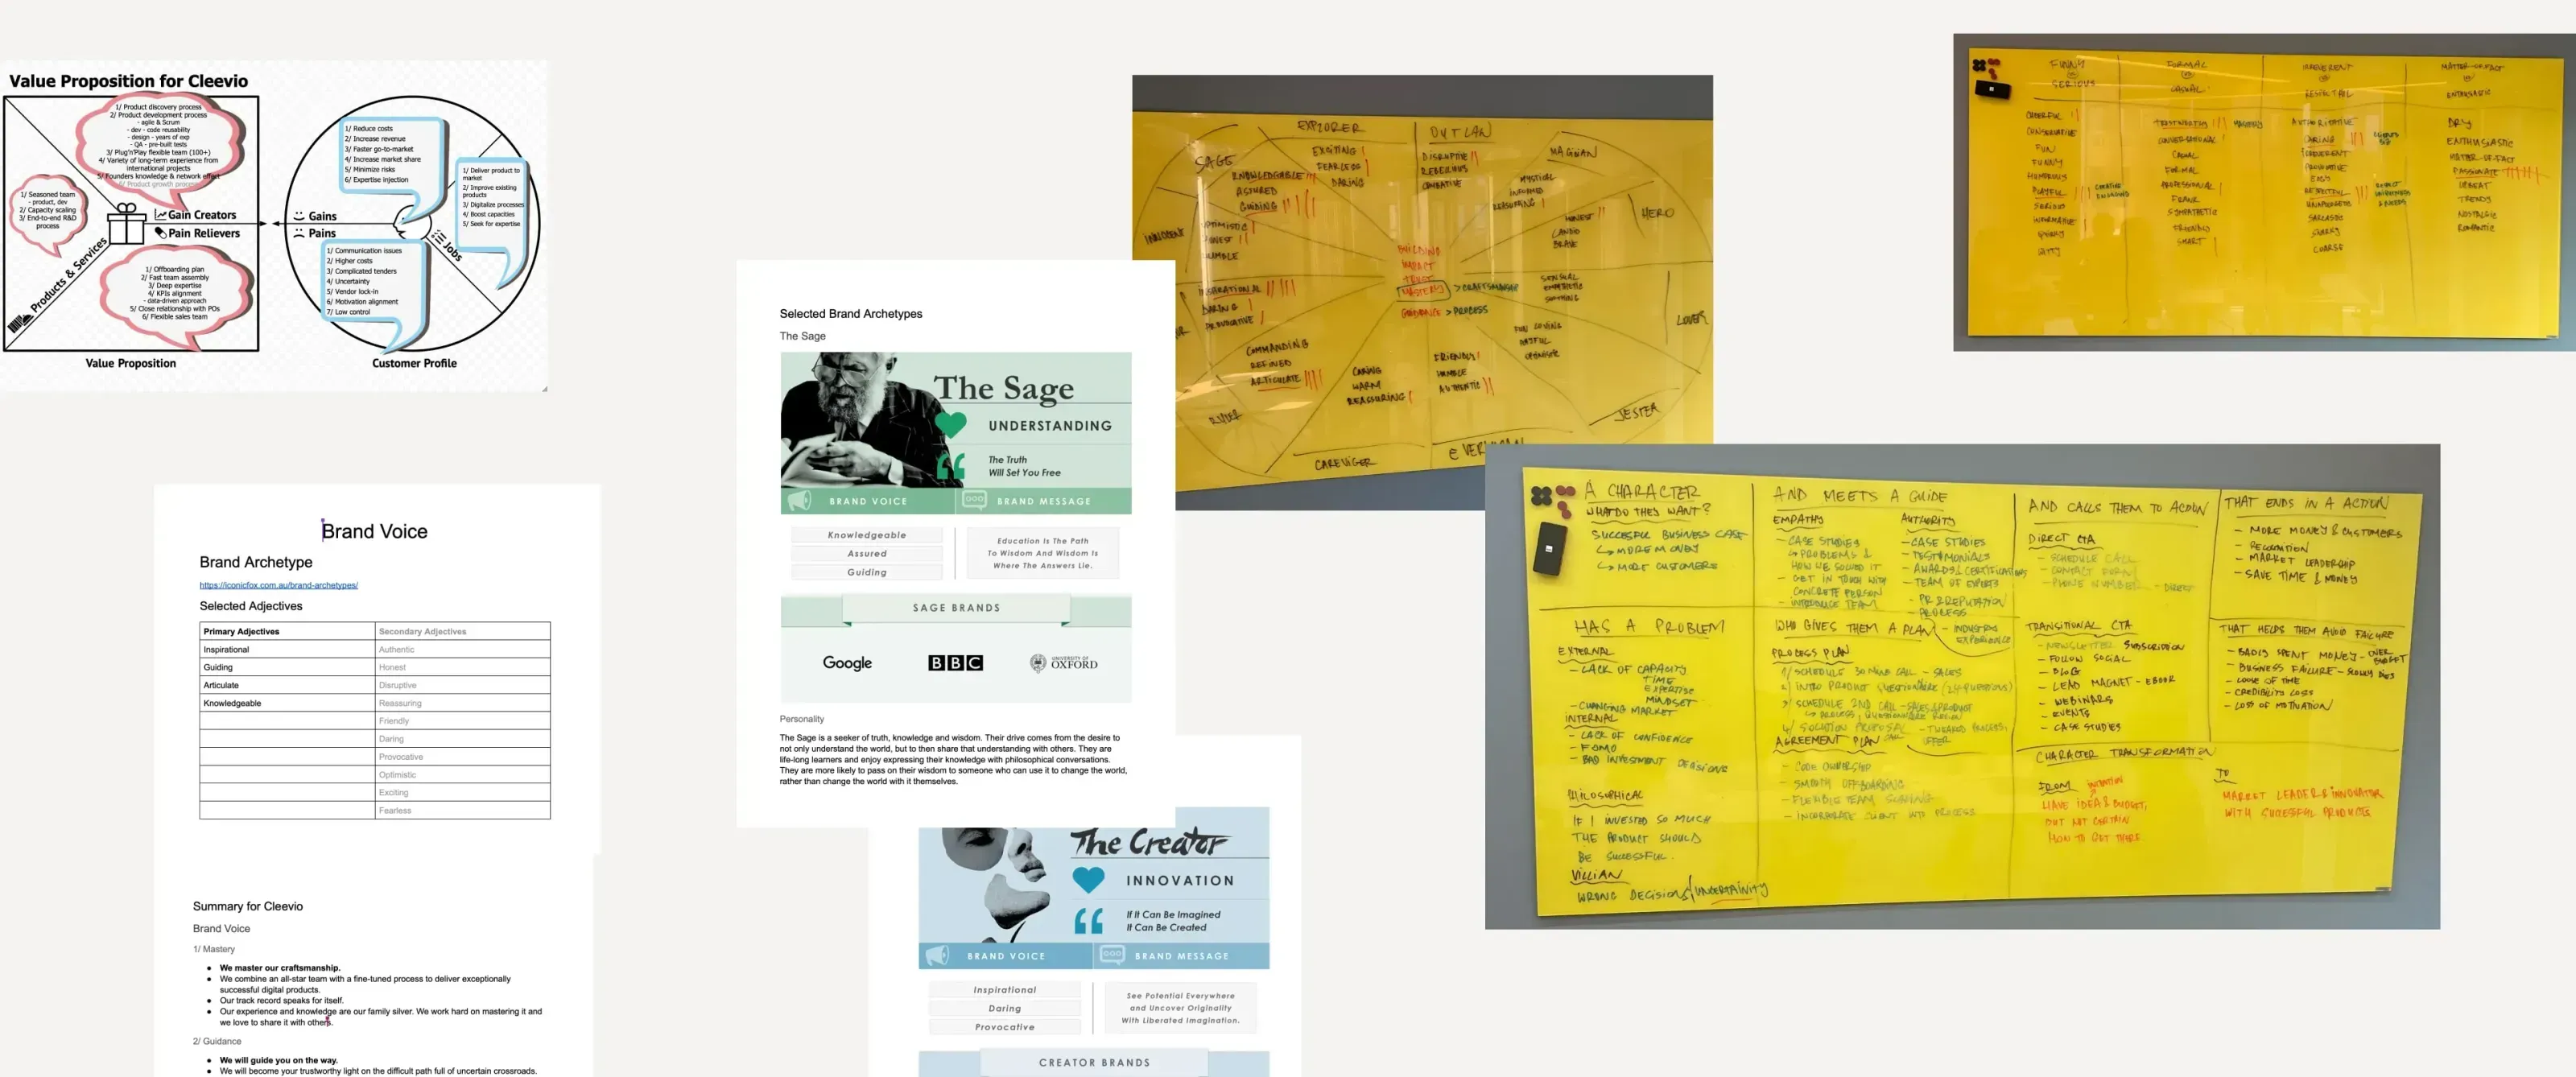
Going Visual
How do you translate “Creative Sage” into a visual identity that can be used across a multitude of media and platforms? After all, these are two personalities that don’t necessarily match together on first look. We simply broke down what each could mean and represent.
- Sage: wise, minimalistic, lightweight, subdued, sharp, professional
- Creative: engaging, playful, inspiring, collaborative, a bit funky
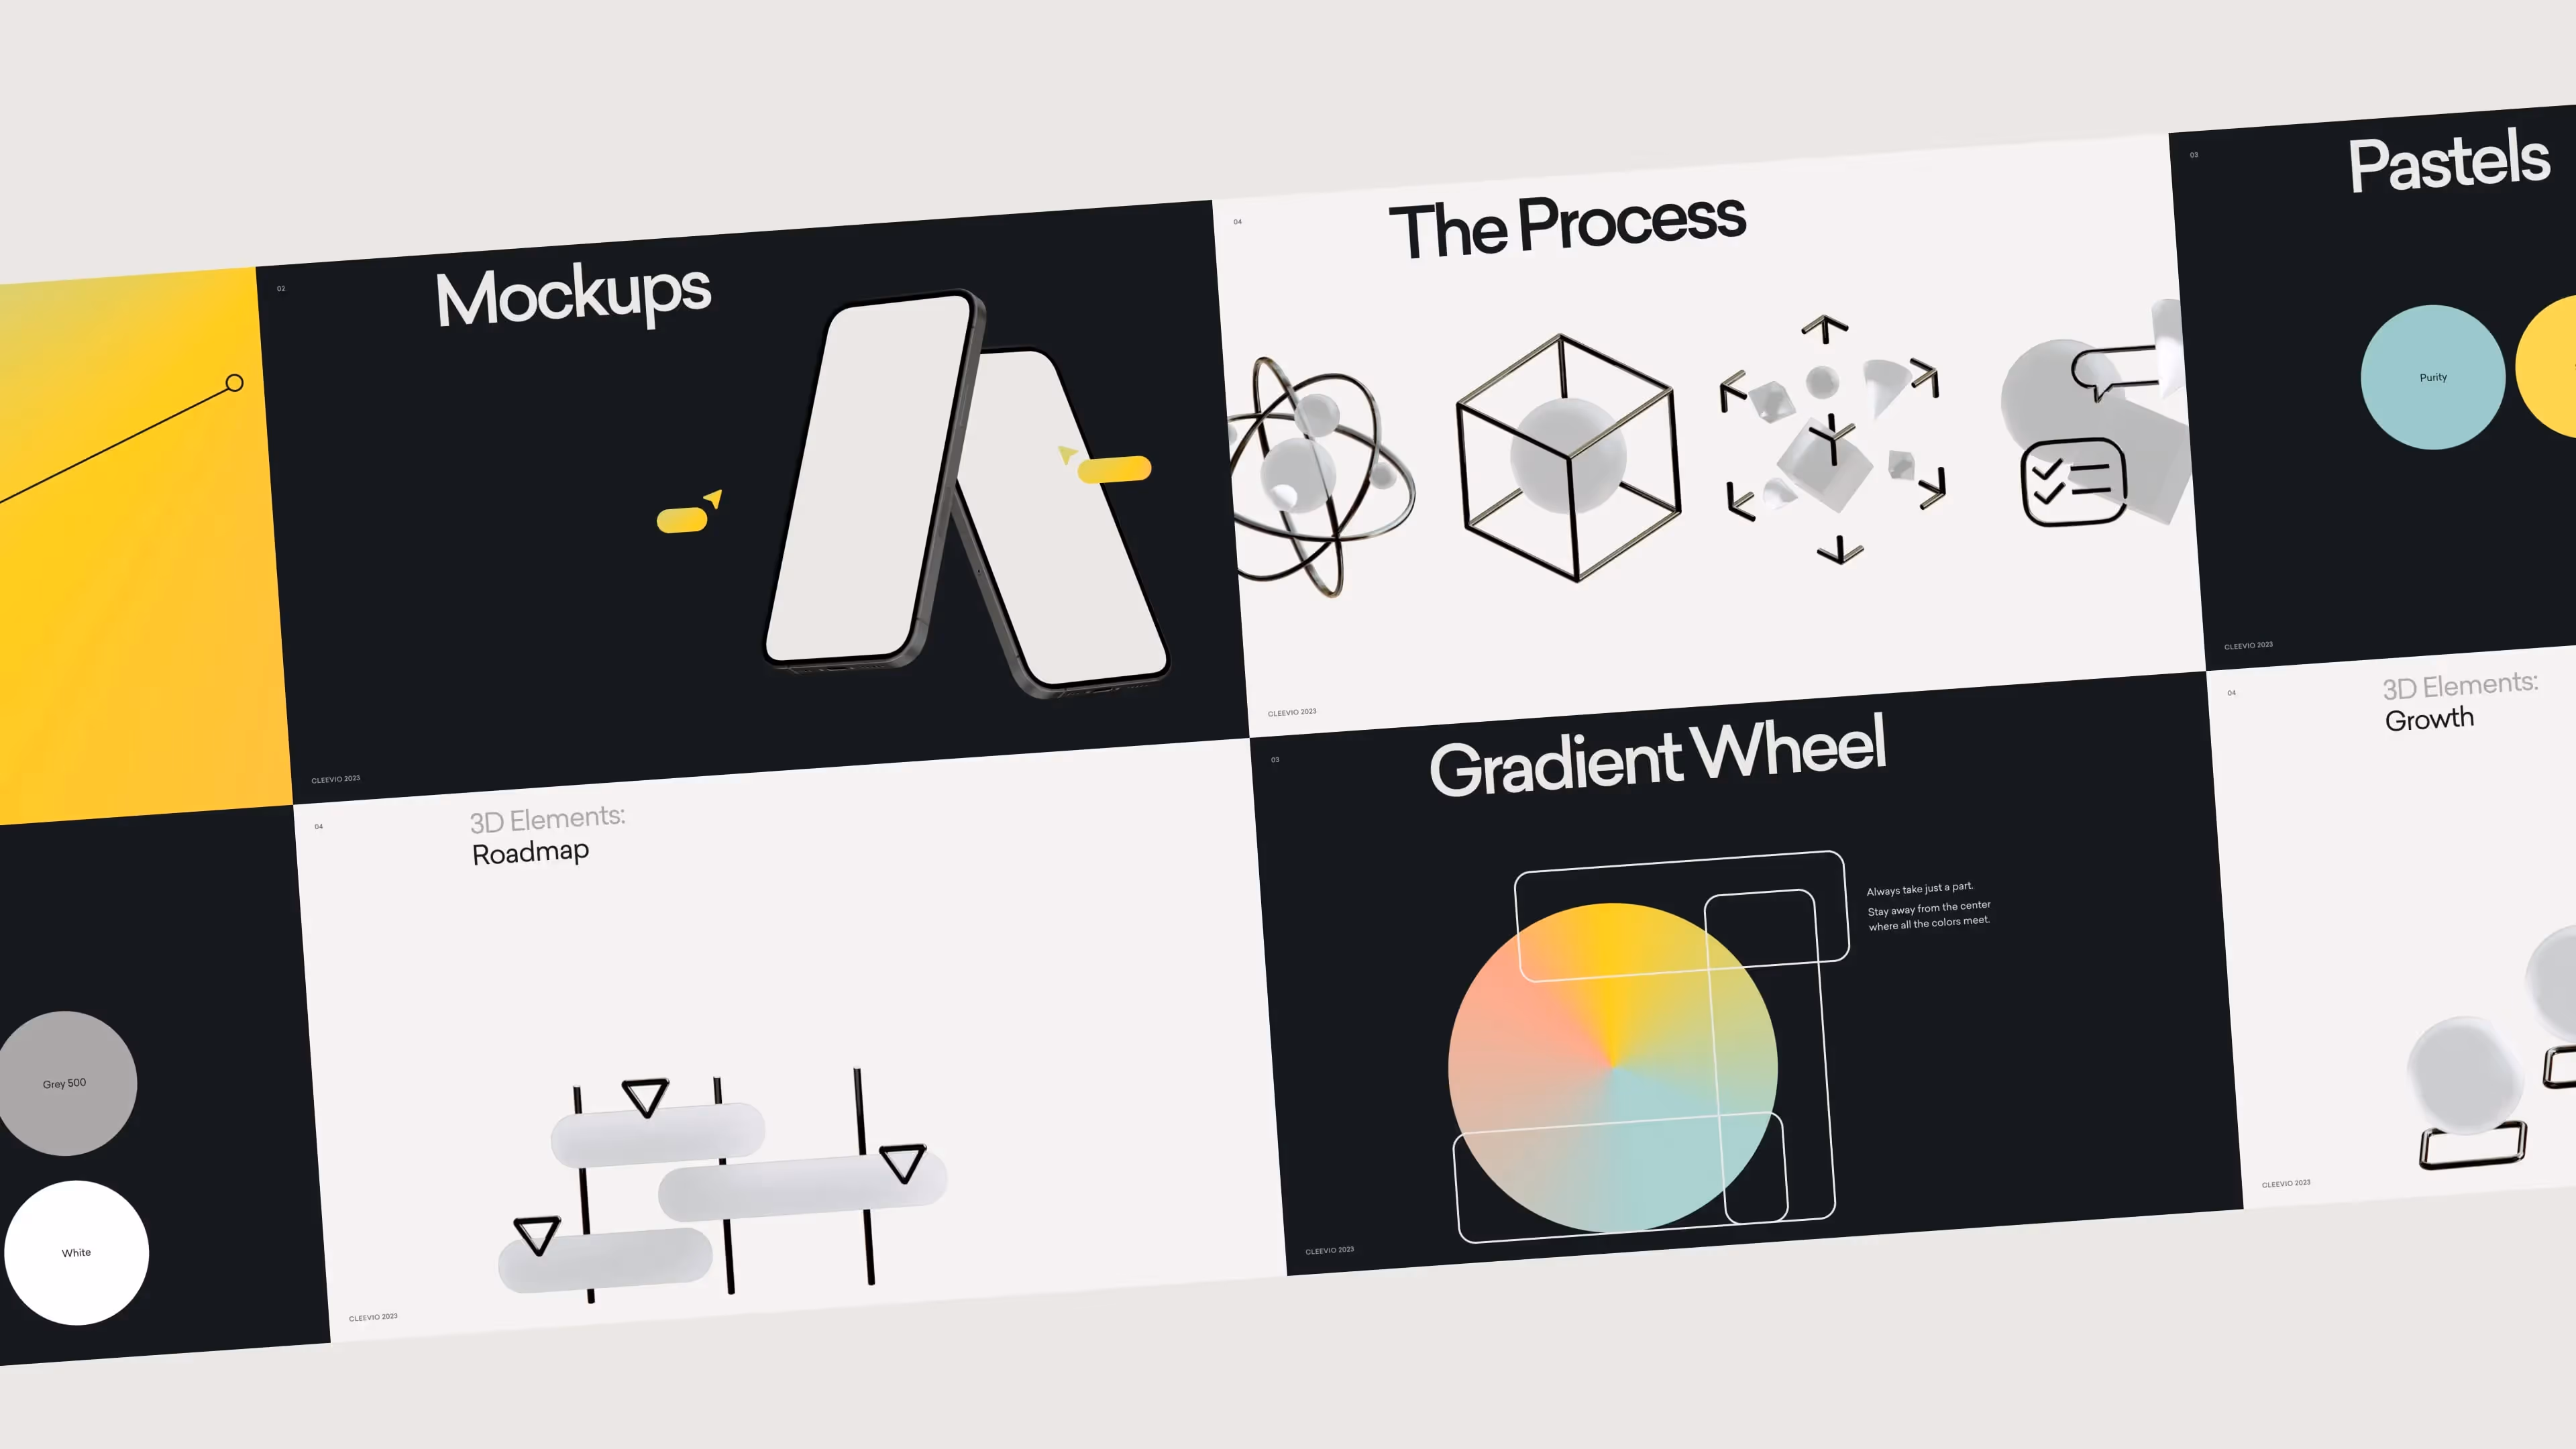
Then it just meant iterating over your usual visual brand components like typography, colors, imagery, layouts and supporting elements.
Explaining What We Do
In addition to having design and engineering hard skills, Cleevio also strives to partner up with clients on the product side of their business. In the end, that means creating the best digital products with the most impact. For that, we need to explain the value we bring to the table.
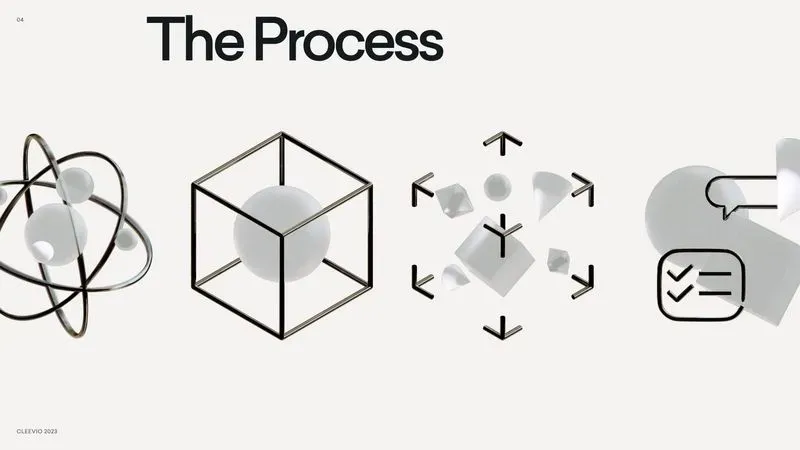
Even the most powerful idea is fragile at first. However, with our 360 process, we can carefully capture it, mold it, and turn it into a successful statement of the client’s vision. Validate, prototype, test, iterate and develop. An excellent product is born.
We tapped into the 3D skills of one of our talented designers, Adam Kozel, to bring this to life. The idea and product are represented by glass structures, while our battle-tested process is visualized by solid black metal framing. On top of that, we use vibrant cursors to show the collaboration between us and the client – a key concept in every product we build.
Looking Into The Future
Launching our updated brand means a lot to us. It is as much a snapshot of where Cleevio is today as it is new ground for us to build on. Most importantly, it gives us a solid foundation to continue building true product partnerships with our clients.


Brand Evolution: Apps Builder to Digital Product Innovation Partner
Cleevio, as a software development company, has been providing businesses with innovative solutions since its beginning. From product-based software solutions to becoming a company that focuses on building business partnerships, Cleevio has undergone a significant transformation. In this article, we will explore how Cleevio has evolved and why we believe in building business partnerships as a crucial part of our future success.
Early days
The early days of Cleevio were focused on developing and delivering product-based software solutions - mostly custom-built mobile apps. This was a common approach for many software companies at the time. However, as the company matured and the market evolved, it became clear that this approach was not sustainable, nor did we like it. The market was becoming increasingly competitive, and there was a need for new and innovative solutions that could help businesses stay ahead of the curve.
Transformation
In response to this, we slowly shifted our gaze and started focusing on building business partnerships. This meant that instead of selling products, we are collaborating with other businesses to provide custom solutions. This approach enabled Cleevio to understand the needs and requirements of each customer and provide a tailored solution that met their specific needs.

Stronger relationships
Our focus on building business partnerships has resulted in the expansion of long-term relationships with our customers. This has helped us increase customer satisfaction and retention, as customers really appreciate the personalized solutions tailored to their specific needs.
"Our team is dedicated to building strong business partnerships with our customers. We understand that every business is unique, and that is the reason why we work so closely with our partners. Our focus on collaboration and partnership has allowed us to remain at the forefront of innovation and provide the latest and most advanced solutions. Together, our team and our partners are driving success in the industry." - David Bezděka, CEO @Cleevio
New business partnerships
Our focus on business partnerships has allowed us to expand our reach and customer base, as it continues to help us work with a growing number of businesses to provide bespoke solutions. By working with others, we increased our visibility with partnerships and reached a wider audience.
Innovation
Another advantage of building business partnerships is that it has allowed us to become more flexible. By working with other businesses, Cleevio has been able to develop new products and services that are better suited to the needs of its customers. This has allowed us to remain at the forefront of innovation and provide our customers with the latest and most advanced solutions.
We see our evolution from a product company to a company building business partnerships as a step forward. By focusing on building strong relationships with our customers, we increased customer satisfaction and retention and expanded our reach and customer base.
We believe that our approach to business partnerships is a great example of how companies can evolve and adapt to changing market conditions.
If you are interested in learning how business innovations can help your business, do not hesitate to get in touch.

Binance Breakfast: Initiative for a Bright Crypto and Blockchain Future

The first of many Binance Breakfasts took place last week in our Prague offices. The event brought the community together to discuss the future of blockchain and crypto in the Czech Republic. Binance's goal is to educate and empower the community, making the country a hub for innovation in the crypto space.
The first half of the event was a presentation of Binance's vision and values as they shared their insights and perspectives with attendees.
The second half of the breakfast was dedicated to networking and building connections between attendees, fostering an environment of collaboration and community. Binance believes that by working together, the crypto and blockchain space can become a safe and accessible place for everyone.

We at Cleevio are passionate about improving the crypto and blockchain industry in the Czech Republic, so we are happy to have helped make this event a reality. We have ambitions to support Binance with market education, consulting local companies and helping develop local BSC projects.
The first Binance Breakfast was just the beginning, and we hope that participants from the banking, fintech, news and web3 scene left the event feeling inspired and motivated.
The next event will be next month. We will focus on creating an action plan to turn these goals into reality. We can not wait to see the progress made in the Czech Republic. With the collective efforts of the community, the Czech Republic has the potential to become a leader in the crypto and blockchain space, and this Binance Breakfast event was just a first step towards that future.

How the Software Product Development Process Works: A Complete Guide

Software product development is a challenging discipline with a clear goal: to deliver a certain product with the help of information technology in the best possible quality and of the greatest possible benefit. All within a defined time and budget, of course.
Building quality products is impossible without a solid partnership between the client and software vendor. I’ll explain why this aspect is critical and share some practical product development tips in this article.
I’ll also walk you through the stages of the product development process, and give you an opportunity to get actively involved in one of them.
Sounds interesting?
Let’s dive in!
Before You Kick Off The Product Development Process
The very first step of the process is defining a clear product idea and selecting a quality product development company.
Once you know exactly what kind of product you want to develop, you’ll need to team up with an experienced product manager to discuss your vision. Remember that it’s you, the client, who’s at the heart of the process- you have the best understanding of your product and a plan for its future.
The product manager will help you translate your vision into reality. Together, you will start with the preparation phase which can include outlining implementation plans and defining product roadmap.
However, the phase might also reveal potential risks, such as low market demand. A good product manager will let you know how much potential your product has and if there is enough of a niche for it to address.
Pro Tip
Don't be afraid to communicate openly with your product manager!
Remember that you can base your cooperation on an NDA contract that guarantees confidentiality on both sides.
After all, the more information you share with your product manager about your business, product, and plans, the more fruitful the collaboration. The product manager will then have a better understanding of your vision, and will be able to incorporate it into every stage of product development. This, in turn, will make the whole process much more efficient.
For example, if you want to go global with your project, it’s a good idea to plan for multiple languages, even if at the beginning you will be using just one.
If you want mobile development, then according to the plans for the future, you can either go with multi-platform development such as Flutter (in the case of a simple application that will remain in a defined scope in the long term) or with native platforms such as Android or iOS (in the case of a complex application with 3rd party integrations).
All of this proves just how important it is to share your full product vision with the product manager.
How Does Software Development Work In Practice?
As mentioned above, a solid, trusted partnership between the client and a product development company is essential to building a successful product.
Here’s what the software product development process consists of:
- The initial stage - your target audience group, value proposition, and high-level user journey are defined, market analysis is specified, product design is prepared, research is done, and solution concept is defined
- The development stage - the technical preparation of the project starts, the infrastructure is created and the actual development and testing begins
- Pilot stage (recommended) - a pilot for beta users is launched which is later transformed into a live product for everyone
- Maintenance stage - once the project is completed, you need to take care of it, either by maintaining it or developing additional features
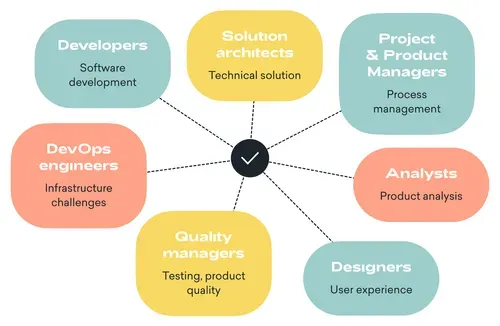
The project may involve multiple experts, such as:
- Developers (many platforms) - responsible for software development
- Quality managers / testers - take care of testing and the overall product quality
- Solution architects - define the most appropriate technical solution based on the product requirements
- Analysts - define the foundation of the product and prepares the specifications
- UX/UI designers / graphics - prepare the visualisation of the product with the user experience in mind
- DevOps engineers - if the solution is complex, infrastructure experts need to be involved to take care of the infrastructure, set up proper monitoring, prepare the system for a heavy load, etc.
- Project/product managers - collaborate directly with the client and manages the team to complete the project effectively
Pro Tip
Make sure you work with people with different areas of expertise!
Involving proper experts at the right time will make the product development process much more efficient, and help deliver a better solution.
Every single expert offers a unique, valuable perspective. For example, UX/UI designers don’t just deliver visuals, but produce designs aligned with user behavior which facilitate product adoption.
Quality managers bring a structured, methodical approach to uncover hidden bugs. They provide essential guidance to developers by pointing out error types, locations and circumstances under which they occur. Thanks to their input, developers can fix the errors early on and proceed with building further functionalities. Quality managers’ focus on detail makes them responsible for deploying a stable product to all users.
Speaking from experience, involving the right people at the right time is absolutely essential from a strategic point of view. Each product is different and might require support from different experts. So, make sure you agree with your product manager on what experts you’ll need, even if just for a single consultation.
Software Product Development And Its Stages
We’ve outlined the stages of product development above. Now, let’s dive deeper into each of them and see what exactly they consist of:
1. The Initial Stage
Although critical, the initial phase is often neglected. It includes mapping out of the product definition, specification, design, and solution concept. All of these elements should ideally be based on real user needs verified by a thorough market research.
For the most effective product development, you need a well-written specification covering two levels:
- Business level, where the use cases are defined
- Technical level, where the approach to the development of use cases is defined
If you’re building a mobile application, web solution, game or any other product requiring a user interface, it is also necessary to have a visualisation - at this stage, you’ll need the support of a UX/UI designer who will prepare intuitive designs making your product easy-to-use.
In the initial phase, you should also dedicate time to market research. It will help you define target groups, understand their needs and find correlations between the two. The data you’ll collect will show the real market demand and user expectations.
Unfortunately, due to its cost, market research is often overlooked. Yet, it is essential to the success of your product. It will help you to not just discover and understand your target market, but also better allocate resources, making the product development process more efficient. It can also help you gain advantage by aligning your solution with user expectations better than the competition.
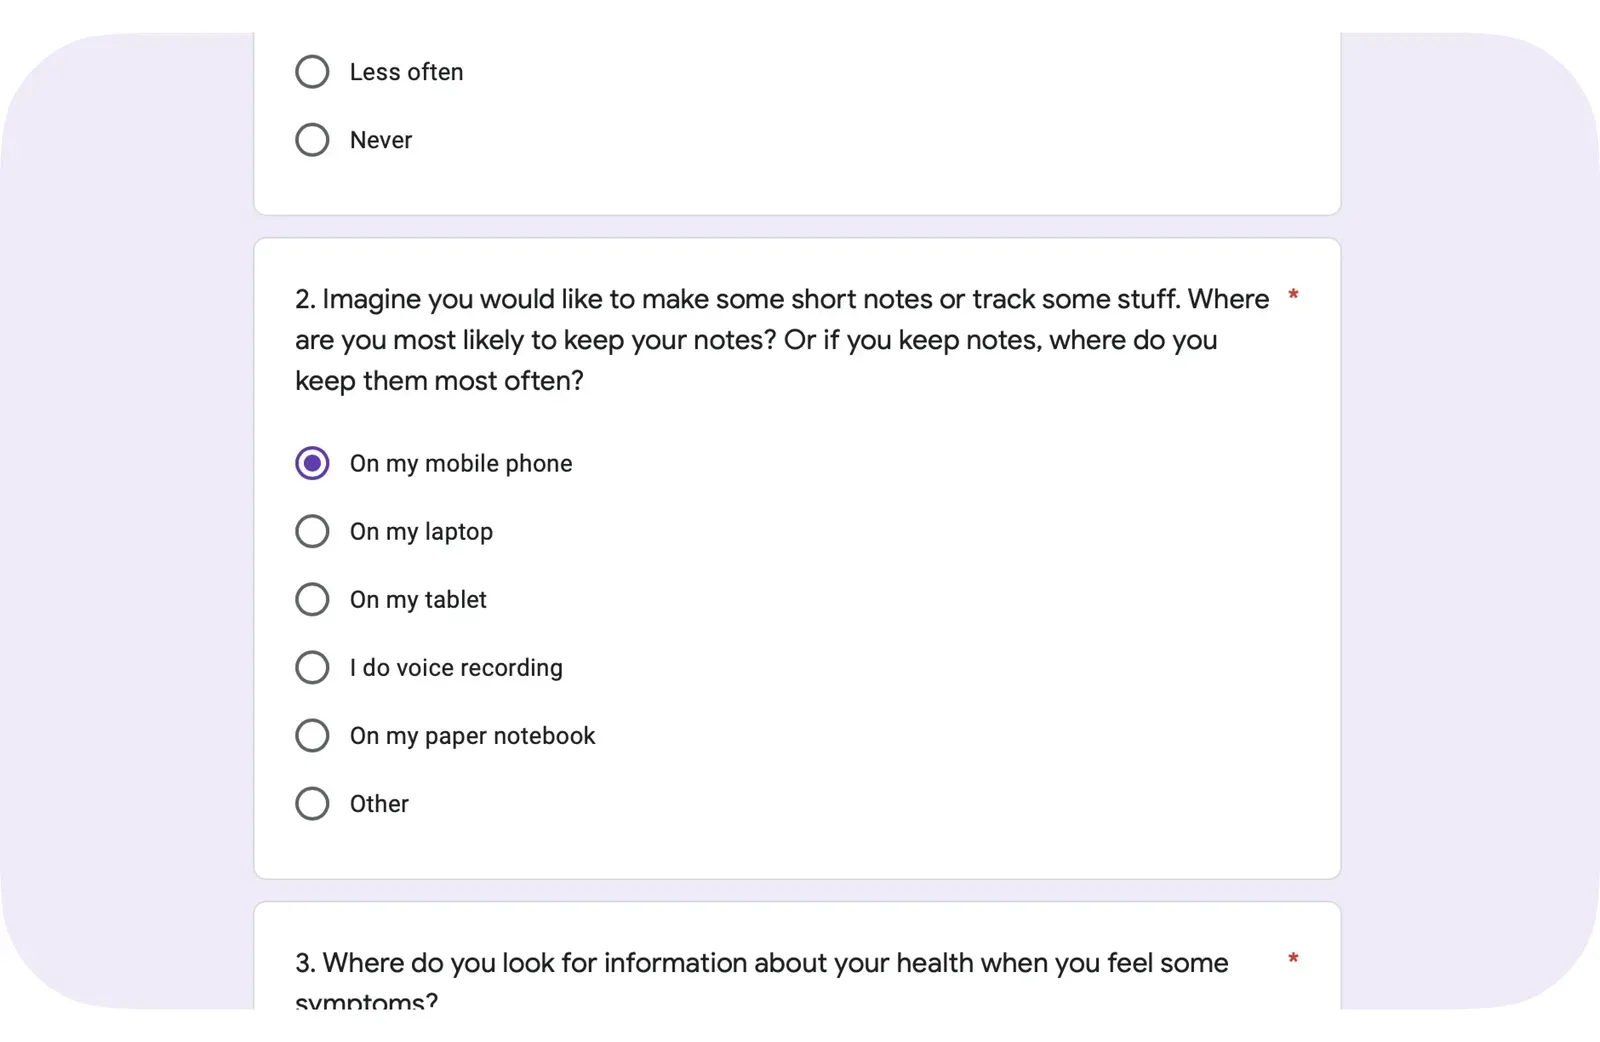
Remember that it is not always necessary to commission the research from a large agency. You can conduct the research yourself using a basic questionnaire that will help you collect the essential information.
If you create a questionnaire yourself, make sure to structure it properly with your target audience in mind. Set a clear number of respondents you want to reach and decide whether you’re going to survey the general public or experts only.
Don’t include too many questions and put the most important ones on top - this way, you’ll get the most critical data while the respondents are still paying attention.
Here’s an example of a questionnaire that one of our partners is currently using for market research - feel free to use it as inspiration, and take the opportunity to actively participate in the initial phase by helping us with your opinion!
The market research insights should be discussed with a solution architect who will recommend the best technical solution based on your brief.
It is key to define the right technical solution at the very beginning of the process, so don’t be afraid to share your vision with the architect. They will present the right approach, and ensure that no major technical changes will need to be made halfway through the project. They will also advise on a security approach that will best help protect your solution.
Pro Tip
Very often, the roles of a graphic designer and a UX/UI designer are misunderstood.
A graphic designer is a visualisation expert who works on user interface. A UX/UI designer focuses both on user interface and user experience.
UX/UI designers combine the in-depth knowledge of design principles with an understanding of user behavior to create a user-friendly experience. They put the elements of your product design into an order that’s aligned with user behavior - as a result, your application will, for example, have appropriately placed buttons or optimized number of clicks leading to a goal completion.

2. The Product Development Stage
The next stage is the actual development of the product that should start with the preparation of the infrastructure.
The preparation includes an efficient setup of the development process that could automate the frequently repeated operations to help save time and move forward faster. It involves setting up the environment/s, infrastructure, security and monitoring in preparation for the actual development.
The development of your product is usually completed in parts. These are delivered in shorter time intervals called sprints. A single sprint starts with planning where tasks for a given time period are defined, and later introduced and developed. Developers meet regularly to address technical issues and potential complications at regular short meetings called standups.
Usually, before the end of a sprint, developers prepare a testing version of the product. The QA team puts it to the test and reports any malfunctions and bugs that the developers need to fix.
The way testing is done depends on the type of your product. In the case of a mobile application, developers have to build code and transform it into an installation package that the tester later downloads, installs, and tests. In the case of web solutions, developers need to deploy the code into the right environment where tests can be conducted.
Depending on the team size, product type, and delivery date, testing can be done in batches, continually, or automatically.
The development stage is one in which you can get involved. After the team completes the development and testing of the demo version of your product, they will present the progress to you. Once this is done, you can examine the features yourself and share feedback with the team. It is best to do product demos on a regular basis to monitor the growth of your product and actively test it yourself.
This collaboration between you and the development team improves the product. You can consistently get an insight into what's been developed and at the same time consult future features or validate best practices with the experts to get your priorities right.
The last stage of testing involves deploying the solution to the right environment where it can be tried by real users.
A sprint ends with a retrospective where the team discusses the ways to improve the solution and collaboration, and plans improvements for the next sprint.
Pro Tip
Testing and deployment are two important areas where automation can be introduced. Doing so usually means a higher effort at the beginning, but subsequently a greater benefit in the future. Manual, repetitive activities can then be solved with one command line or within one click of a button which saves your team’s time and gives them space to focus on other product areas.
On the other hand, your team should only automate where it makes sense. For example, automated deployment, automated login and logout scenarios are usually more efficient.
But because automated tests are performed without human intervention, they cannot replace human evaluation. So if your solution contains functionalities that cannot be accurately described, automating them might not be the best approach.
The best practice is to let DevOps engineers decide what stages of the product development process could be automated and with what tools for optimal results. Other experts will surely find something to automate too, but please always consider added value before introducing automation.

3. The Pilot Stage
I highly recommend starting with a pilot/beta version of your product before full launch.
The opportunity to test the product with several real users and getting their feedback is key to understanding if and how your solution resonates with the target market. The pilot stage also allows you to assess the stability of your product and catch any remaining bugs early, when their impact is still relatively small.
Once your product has been beta tested, it’s time for the big release!
Pro Tip
If you’re not short on time or budget, always plan for the pilot stage. The insights about usability and functionality it provides are invaluable, and can save you a lot of headaches in the long run.
If you don’t have resources to run a pilot, use the data you gathered through testing, and openly communicate to users any shortcomings like missing features. This way, you’ll set proper expectations and minimize the risk of potential complaints.
4. The Maintenance Stage
After deployment into production, the product is available to potential customers. At this point, you can either let it run or continue with developing further functionalities. It is highly recommended to closely monitor the product’s performance and user behavior with analytical and monitoring tools.
Analytical tools help us understand user behavior and therefore better tailor in-demand functionalities - and even marketing campaigns! Monitoring tools, in turn, allow us to keep an eye on the infrastructure and take preventive measures against any crashes, so we can either stop them before they occur or, if they do happen, introduce fixes before the errors affect a large group of users.
In the maintenance phase, you can also do another market research to determine what other functionalities might be a good addition to your product.
Pro Tip
When the product development process comes to an end, two things are often overlooked - documentation and support.
Proper documentation should be an integral part of every solution. As people change teams and projects, the documentation is often the only remaining source of truth about the product - that’s why it should be updated on a regular basis and stored safely.

Support is essential in the post-release phase, as it provides hands-on help with any product issues or upgrades. In the best case scenario, you should have onboarded a dedicated team that is ready to jump in whenever help is needed in the development stage. This minimizes the impact of production issues on your users.
Otherwise, if no further development or support is available once your product is released, you risk running into technical or regulatory issues. The IT world is rapidly evolving - there are new technologies or privacy and security regulations that require your product to be regularly updated. Besides, even the most stable solutions need proper maintenance.
So, always keep in mind the future of your product and the fact that it is going to require good care and upkeep.
The Takeaway
Summing up, when it comes to the product development process, the partnership between the client and the provider is absolutely essential to successfully turning your idea into a product.
Do not underestimate the importance of preparation, and always do proper research, involve UX/UI designers, and openly communicate your vision - all these aspects help to define the right architecture of the solution.
Remember that the developers will deliver your product in smaller bits, so stay in touch with your product manager to regularly monitor progress and ensure that you continue on the path you want to take.
Before you launch, test your product among a narrow group of users to collect feedback and detect any errors. And don’t forget about documentation and support that will help keep your product cataloged and up-to-date.
The best part of the whole product development process is the fact that you can create solutions that save time and money, make processes more efficient, and overall contribute to making our lives easier!